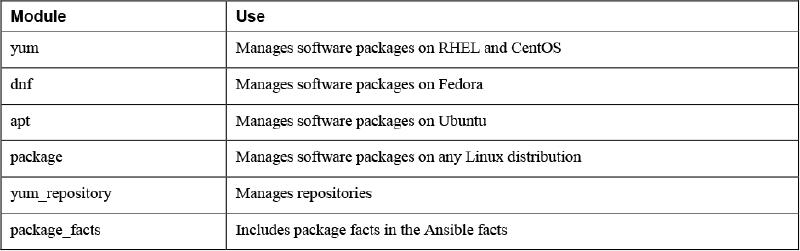
Using Modules to Manage Packages #
Modules used to manage packages:
Configuring Repository Access #
The yum_repository module lets you work with yum repository files in the /etc/yum.repos.d/ directory.
    ---
    - name: setting up repository access
      hosts: all
      tasks:
      - name: connect to example repo
        yum_repository:
          name: example repo
          description: RHCE8 example repo
          file: examplerepo
          baseurl: ftp://control.example.com/repo/
          gpgcheck: no
yum_repository Key Arguments

Use of the gpgcheck argument is recommended but not mandatory. Most repositories are provided with a GPG key to verify that packages in the repository have not been tampered with. However, if no GPG key is set up for the repository, the gpgcheck parameter can be set to no to skip checking the GPG key.
Managing Software with yum #
The yum module can be used to manage software packages. You use it to install and remove packages or to update packages. This can be done for individual packages, as well as package groups and modules. Let’s look at some examples that go beyond the mere installation or removal of packages, which was covered sufficiently in earlier chapters.
Listing 12-2 shows a module that will update all packages on this system.
Listing 12-2 Using yum to Perform a System Update
::: pre_1 — - name: updating all packages hosts: ansible2 tasks: - name: system update yum: name: ’*’ state: latest :::
Notice the use of the name argument to the yum module. It has ’*’ as its argument. To prevent the wildcard from being interpreted by the shell, you must make sure it is placed between single quotes.
Listing 12-3 shows an example where yum package groups are used to install the Virtualization Host package group.
Listing 12-3 Installing Package Groups
::: pre_1 — - name: install or update a package group hosts: ansible2 tasks: - name: install or update a package group yum: name: ’@Virtualization Host’ state: latest :::
When a yum package group instead of an individual package needs to be installed, the name of the package group needs to start with an at sign (@), and the entire package group name needs to be put between single quotes. Also notice the use of state: latest in Listing 12-3. This line ensures that the packages in the package group are installed if they have not been installed yet. If they have already been installed, they are updated to the latest version.
A new feature in RHEL 8 is the yum AppStream module. Modules as listed by the Linux yum modules list command can be managed with the Ansible yum module also. Working with yum modules is similar to working with yum package groups. In the example in Listing 12-4, the main difference is that a version number and the installation profile are included in the module name.
Listing 12-4 Installing AppStream Modules with the yum Module
::: pre_1 — - name: installing an AppStream module hosts: ansible2 tasks: - name: install or update an AppStream module yum: name: ’@php:7.3/devel’ state: present :::
::: note
Note
When using the yum module to install multiple packages, you can provide the name argument with a list of multiple packages. Alternatively, you can provide multiple packages in a loop. Of these solutions, using a list of multiple packages as the argument to name is always preferred. If multiple package names are provided in a loop, the module must execute a task for every single package. If multiple package names are provided as the argument to name, yum can install all these packages in one single task.
:::
Managing Package Facts #
When Ansible is gathering facts, package facts are not included. To include package facts as well, you need to run a separate task; that is, you need to use the package_facts module. Facts that have been gathered about packages are stored to the ansible_facts.packages variable. The sample playbook in Listing 12-5 shows how to use the package_facts module.
Listing 12-5 Using the package_facts Module to Show Package Details
::: pre_1 — - name: using package facts hosts: ansible2 vars: my_package: nmap tasks: - name: install package yum: name: “{{ my_package }}” state: present - name: update package facts package_facts: manager: auto - name: show package facts for {{ my_package }} debug: var: ansible_facts.packages[my_package] when: my_package in ansible_facts.packages :::
As you can see, the package_facts module does not need much to do its work. The only argument used here is the manager argument, which specifies which package manager to communicate to. Its default value of auto automatically detects the appropriate package manager and uses that. If you want, you can specify the package manager manually, using any package manager such as yum or dnf. Listing 12-6 shows the output of running the Listing 12-5 playbook, where you can see details that are collected by the package_facts module.
Listing 12-6 Running ansible-playbook listing125.yaml Results
::: pre_1 [ansible@control rhce8-book]$ ansible-playbook listing125.yaml
PLAY [using package facts] **************************************************************

TASK [Gathering Facts] ******************************************************************
ok: [ansible2]

TASK [install package] ******************************************************************
ok: [ansible2]

TASK [update package facts] *************************************************************
ok: [ansible2]

TASK [show package facts for my_package] ************************************************
ok: [ansible2] => {
    "ansible_facts.packages[my_package]": [
        {
            "arch": "x86_64",
            "epoch": 2,
            "name": "nmap",
            "release": "5.el8",
            "source": "rpm",
            "version": "7.70"
        }
    ]
}

PLAY RECAP ******************************************************************************
ansible2                   : ok=4    changed=0    unreachable=0    failed=0    skipped=0    rescued=0    ignored=0
:::
In Exercise 12-1 you can practice working with the different tools Ansible provides for module management.
::: box Exercise 12-1 Managing Software Packages
1. Use your editor to create a new file with the name exercise121.yaml.
2. Write a play header that defines the variable my_package and sets its value to virt-manager:
---
- name: exercise121
  hosts: ansible2
  vars:
    my_package: virt-manager
  tasks:
3. Add a task that installs the package based on the name of the variable that was provided:
- name: install package
  yum:
    name: "{{ my_package }}"
    state: present
4. Add a task that gathers facts about installed packages:
- name: update package facts
  package_facts:
    manager: auto
5. As the last part of this exercise, add a task that shows facts about the package that you have just installed:
- name: show package facts for {{ my_package }}
  debug:
    var: ansible_facts.packages[my_package]
  when: my_package in ansible_facts.packages
6. Run the playbook using ansible-playbook exercise121.yaml and verify its output. :::
Using Modules to Manage Repositories and Subscriptions #
To work with software packages, you need to make sure that repositories are accessible and subscriptions are available. In the previous section you learned how to write a playbook that enables you to access an existing repository. In this section you learn how to set up the server part of a repository if that still needs to be done. Also, you learn how to manage RHEL subscriptions using Ansible.
Setting Up Repositories #
Most managed systems access the default distributions that are provided while installing the operating system. In some cases external repositories might not be accessible. If that happens, you need to set up a repository yourself. Before you can do that, however, it’s important to know what a repository is. A repository is a directory that contains RPM files, as well as the repository metadata, which is an index that allows the repository client to figure out which packages are available in the repository.
Ansible does not provide a specific module to set up a repository. You must use a number of modules instead. Exactly which modules are involved depends on how you want to set up the repository. For instance, if you want to set up an FTP-based repository on the Ansible control host, you need to accomplish the following tasks:
• Install the FTP package.
• Start and enable the FTP server.
• Open the firewall for FTP traffic.
• Make sure the FTP shared repository directory is available.
• Download packages to the repository directory.
• Use the Linux createrepo command to generate the index that is required in each repository.
The playbook in Listing 12-7 provides an example of how this can be done.
Listing 12-7 Setting Up an FTP-based Repository
::: pre_1 - name: install FTP to export repo hosts: localhost tasks: - name: install FTP server yum: name: - vsftpd - createrepo_c state: latest - name: start FTP server service: name: vsftpd state: started enabled: yes - name: open firewall for FTP firewalld: service: ftp state: enabled permanent: yes
- name: setup the repo directory
  hosts: localhost
  tasks:
  - name: make directory
    file:
      path: /var/ftp/repo
      state: directory
  - name: download packages
    yum:
      name: nmap
      download_only: yes
      download_dir: /var/ftp/repo
  - name: createrepo
    command: createrepo /var/ftp/repo
:::
The most significant tasks in setting up the repository are the download packages and createrepo tasks. In the download packages task, the yum module is used to download a single package. To do so, the download_only argument is used to ensure that the package is not installed but downloaded to a directory. When you use the download_only argument, you also must specify where the package needs to be installed. To do this, the task uses the download_dir argument.
There is one disadvantage in using this approach to download the package, though: it requires repository access. If repository access is not available, the fetch module can be used instead to download a file from a specific URL.
Managing GPG Keys #
To guarantee the integrity of packages, most repositories are set up with a GPG key. This enables the client to verify that packages have not been tampered with while transmitted between the repository server and client. For that reason, if packages are installed from a repository server on the Internet, you should always make sure that gpgcheck: yes is set while using the yum_repository module.
However, if you want to make sure that a GPG check is performed, you need to make sure the client knows where to fetch the repository key. To help with that, you can use the rpm_key module. You can see how to do this in Listing 12-8. Notice that the playbook in this listing doesn’t work because no GPG-protected repository is available. Setting up GPG-protected repositories is complex and outside the scope of the EX294 objectives, and for that reason is not covered here.
Listing 12-8 Using rpm_key to Fetch an RPM Key
::: pre_1 - name: use rpm_key in repository access hosts: all tasks: - name: get the GPG public key rpm_key: key: ftp://control.example.com/repo/RPM-GPG-KEY state: present - name: set up the repository client yum_repository: file: myrepo name: myrepo description: example repo baseurl: ftp://control.example.com/repo enabled: yes gpgcheck: yes state: present :::
Managing RHEL Subscriptions #
When you work with Red Hat Enterprise Linux, configuring repository access using the method described before is not enough. Red Hat Enterprise Linux works with subscriptions, and to be able to access software that is provided through your subscription entitlement, you need to set up managed systems to access these subscriptions.
::: note
Tip
Free developer subscriptions are available for RHEL as well as Ansible. Register yourself at https://developers.redhat.com and sign up for a free subscription if you want to test the topics described in this section on RHEL and you don’t have a valid subscription yet.
:::
To understand how to use the Ansible modules to register a RHEL system, you need to understand how to use the Linux command-line utilities. When you are managing subscriptions from the Linux command line, multiple steps are involved.
1. First, you use the subscription-manager register command to provide your RHEL credentials. Use, for instance, subscription-manager register --username=yourname --password=yourpassword.
2. Next, you need to find out which pools are available in your account. A pool is a collection of software channels available to your account. Use subscription-manager list --available for an overview.
3. Now you can connect to a specific pool using subscription-manager attach --pool=poolID. Note that if only one subscription pool is available in your account, you don’t have to provide the --pool argument.
4. Next, you need to find out which additional repositories are available to your account by using subscription-manager repos --list.
5. To register to use additional repositories, you use subscription-manager repos --enable “repos name”. Your system then has full access to its subscription and related repositories.
Two significant modules are provided by Ansible:
• redhat_subscription: This module enables you to perform subscription and registration in one task.
• rhsm_repository: This module enables you to add subscription manager repositories.
Listing 12-9 shows an example of a playbook that uses these modules to fully register a new RHEL 8 machine and add a new repository to the managed machine. Notice that this playbook is not runnable as such because important additional information needs to be provided. Exercise 12-3, later in the section titled “Implementing a Playbook to Manage Software,” will guide you to a scenario that shows how to use this code in production.
Listing 12-9 Using Subscription Manager to Set Up Ansible
::: pre_1 — - name: use subscription manager to register and set up repos hosts: ansible5 tasks: - name: register and subscribe ansible5 redhat_subscription: username: bob@example.com password: verysecretpassword state: present - name: configure additional repo access rhsm_repository: name: - rh-gluster-3-client-for-rhel-8-x86_64-rpms - rhel-8-for-x86_64-appstream-debug-rpms state: present :::
In the sample playbook in Listing 12-9, you can see how the redhat_subscription and rhsm_repository modules are used. Notice that redhat_subscription requires a password. In Listing 12-9 the username and password are provided as clear-text values in the playbook. From a security perspective, this is very bad practice. You should use Ansible Vault instead. Exercise 12-3 will guide you through a setup where this is done.
In Exercise 12-2 you are guided through the procedure of setting up your own repository and using it. This procedure consists of two distinct parts. In the first part you set up a repository server that is based on FTP. Because in Ansible you often need to configure topics that don’t have your primary attention, you set up the FTP server and also change its configuration. Next, you write a second playbook that configures the clients with appropriate repository access, and after doing so, install a package.
::: box Exercise 12-2 Setting Up a Repository
1. Use your editor to create the file exercise122-server.yaml.
2. Define the play that sets up the basic FTP configuration. Because all its tasks should be familiar to you at this point, you can enter all the tasks at once:
---
- name: install, configure, start and enable FTP
  hosts: localhost
  tasks:
  - name: install FTP server
    yum:
      name: vsftpd
      state: latest
  - name: allow anonymous access to FTP
    lineinfile:
      path: /etc/vsftpd/vsftpd.conf
      regexp: ’^anonymous_enable=NO’
      line: anonymous_enable=YES
  - name: start FTP server
    service:
      name: vsftpd
      state: started
      enabled: yes
  - name: open firewall for FTP
    firewalld:
      service: ftp
      state: enabled
      immediate: yes
      permanent: yes
3. Set up a repository directory. Add the following play to the playbook. Notice the use of the download packages task, which uses the yum module to download a package without installing it. Also notice the createrepo task, which creates the repository metadata that converts the /var/ftp/repo directory into a repository.
- name: setup the repo directory
  hosts: localhost
  tasks:
  - name: make directory
    file:
      path: /var/ftp/repo
      state: directory
  - name: download packages
    yum:
      name: nmap
      download_only: yes
      download_dir: /var/ftp/repo
  - name: install createrepo package
    yum:
      name: createrepo_c
      state: latest
  - name: createrepo
    command: createrepo /var/ftp/repo
    notify:
    - restart_ftp
  handlers:
  - name: restart_ftp
    service:
      name: vsftpd
      state: restarted
4. Use the command ansible-playbook exercise122-server.yaml to set up the FTP server on control.example.com. If you haven’t made any typos, you shouldn’t encounter any errors.
5. Now that the repository server has been installed, it’s time to set up the repository client. Use your editor to create the file exercise122-client.yaml and write the play header as follows:
---
- name: configure repository
  hosts: all
  vars:
    my_package: nmap
  tasks:
6. Add a task that uses the yum_repository module to configure access to the new repository:
- name: connect to example repo
  yum_repository:
    name: exercise122
    description: RHCE8 exercise 122 repo
    file: exercise122
    baseurl: ftp://control.example.com/repo/
    gpgcheck: no
7. After setting up the repository client, you also need to make sure that the clients know how to reach the repository server by addressing its name. Add the next task that writes a new line to /etc/hosts to make sure host name resolving on the clients is set up correctly:
- name: ensure control is resolvable
  lineinfile:
    path: /etc/hosts
    line: 192.168.4.200  control.example.com  control

- name: install package
  yum:
    name: "{{ my_package }}"
    state: present
8. If you are using the package_facts module, you need to remember to update it after installing new packages. Add the following task to get this done:
- name: update package facts
  package_facts:
    manager: auto
9. As the last task, just because it’s fun, use the debug module together with the package facts to get information about the newly installed package:
- name: show package facts for {{ my_package }}
  debug:
    var: ansible_facts.packages[my_package]
  when: my_package in ansible_facts.packages
10. Use the command ansible-playbook exercise122-client.yaml -e my_package=redis. That’s right; this command overwrites the my_package variable that was set in the playbook—just to remind you a bit about variable precedence. :::
Implementing a Playbook to Manage Software #
In the previous sections you learned how to use different modules to manage software. In this section you apply this knowledge in a more advanced playbook example. You’ll also find an advanced example like this in Chapters 13 through 15 so that you get the best possible preparation for the EX294 exam. To match the exam style of questions, the example is scenario based, and the assignment is formatted as a step-by-step exercise. As is the case for all exercises, the complete playbook discussed here is available in the GitHub repository at https://github.com/sandervanvugt/rhce8-book/exercise123.yaml.
To run this assignment on a RHEL 8 target, you need access to a valid RHEL 8 subscription. If you don’t have a current subscription, you can request it from https://developers.redhat.com.
::: box Exercise 12-3 Configuring a New RHEL Managed Node
Create a playbook that will fully automate the setup of a new RHEL host. Write this playbook according to the following requirements:
• Add the new host information to the inventory and /etc/hosts file on the control host.
• Work with variables for the name of the host you want to set up.
• Connect as user root to the new host. While running the playbook, run it with the appropriate option so that you will be prompted for the root password.
• Set up the user ansible on the new host and make sure this user is a member of the group wheel.
• Also, set a password for user ansible using the playbook.
• Modify the sudoers file such that the user ansible can run root commands using sudo without having to enter a password.
• Automatically register the host with the RHEL Subscription Manager.
• Use Ansible Vault to provide the username and password in a secure way.
• Add the new host to the rh-gluster-3-client-for-rhel-8-x86_64-rpms repository and the rhel-8-for-x86_64-appstream-debug-rpms repository.
• Use tags so that you can run individual parts of the playbook.
1. On the control host, use sudo yum install sshpass to install the sshpass package. This package enables you to work with SSH passwords in a noninteractive way, and you need it to automate working with SSH passwords from a playbook environment.
2. To start, you need to set up the control host to include information about the new host. To make this playbook flexible, this playbook requires variables to be set from the command line because that is the only way to ensure that the variable is available in all of the plays. Using vars_prompt would have been an option, but variables that are set with vars_prompt apply only to the play in which they are set. To check that the variables were indeed passed as an argument to the ansible-playbook command, use the fail module as follows to check whether the variable newhost and the variable newhostip are provided as startup arguments. Create a file with the name exercise123.yaml as follows:
- name: add host to inventory
  hosts: localhost
  tasks:
  - fail:
      msg: "add the options -e newhost=hostname -e newhostip=ip.ad.dr.ess and try again"
    when: (newhost is undefined) or (newhostip is undefined)
3. Write the tasks for this first play. In these tasks, you want to make sure that the local inventory file and the /etc/hosts file are modified. To do this, the lineinfile module provides good service. Notice the use of the line the second time the lineinfile module is called. The line contains only variables, and for that reason the entire variable string must be between double quotes. Also, at the end of the play, include the tags: addhost line, which makes it easy to skip this task after it has run successfully in case it is needed to run the playbook again. Make sure to add the following text to complete the first play:
- name: add new host to inventory
  lineinfile:
    path: inventory
    state: present
    line: "{{ newhost }}"
- name: add new host to /etc/hosts
  lineinfile:
    path: /etc/hosts
    state: present
    line: "{{ newhostip }}  {{ newhost}}"
tags: addhost
4. At this point it’s a good idea to test that all is going well so far. Use ansible-playbook -C exercise123.yaml and observe playbook output. It should fail because no arguments are provided on the command line. Use ansible-playbook -C exercise123.yaml -e newhost=ansible5 -e newhostip=192.168.4.205 and try again.
5. The first play is ready at this point, so it’s time to configure the second play. This play is executed on the new host. The target host name is set to the variable newhost, which is defined while running the ansible-playbook command. Also notice that the remote_user and the become statements must be set because the default user ansible is not configured for privilege escalation yet. Write the play header for this second play as follows:
- name: configure a new RHEL host
  hosts: "{{ newhost }}"
  remote_user: root
  become: false
  tasks:
6. Now it’s time to add the tasks, as well as the tag to this play. In the tasks you need to make sure a user ansible exists and is a member of the group wheel. Next, you use the shell module to set a password for the user ansible. It’s an ugly approach, but it works. In Chapter 13, “Managing Users,” you’ll learn how to do this in a much nicer way. As the next task you use the lineinfile module to modify the /etc/sudoers file and allow members of the group wheel to escalate permissions without entering a password. Add the tasks to do this as follows:
- name: configure user ansible
  user:
    name: ansible
    groups: wheel
    append: yes
    state: present
- name: set a password for this user
  shell: ’echo password | passwd --stdin ansible’
- name: enable sudo without passwords
  lineinfile:
    path: /etc/sudoers
    regexp: ’^%wheel’
    line: ’%wheel ALL=(ALL)  NOPASSWD: ALL’
    validate: /usr/sbin/visudo -cf %s
7. With this part you have set up the user ansible on the managed host, but one element is still missing: the user cannot log in with an SSH public/private key pair yet. In Chapter 13 you’ll learn about a nice way to add the SSH public key to the remote user; for now you can do it in a quick-and-dirty way that will also work. Add the following lines to the playbook to conclude the second play:
- name: create SSH directory in user ansible home
  file:
    path: /home/ansible/.ssh
    state: directory
    owner: ansible
    group: ansible
- name: copy SSH public key to remote host
  copy:
    src: /home/ansible/.ssh/id_rsa.pub
    dest: /home/ansible/.ssh/authorized_keys
tags: setuphost
8. Feel free to test the second play at this point; it’s better to filter out any errors now than to do it later. To test, use ansible-playbook -C -k exercise123.yaml -e newhost=ansible5 -e newhostip=192.168.4.205. Notice the use of the -k option, which prompts for the SSH password that user root in this play needs to set up the target host.
9. At this point your RHEL host should be ready for use. The only thing that is still missing is that it has not been registered against Red Hat Subscription Manager. To do this, you need your Red Hat credentials. Because these credentials are sensitive information, you should use Ansible Vault. So let’s start creating the vault file and define the username and password variables in the Vault file. To create the Vault file, use ansible-vault create exercise123-vault.yaml and provide the following input, where you should use your real username and password and not XXXXXXXXX. Your rhsm_user name is the name (typically an email address) that you use to log in at redhat.com, and the rhsm_password is the password that you use with it. Also notice that for obvious security reasons, this file is NOT provided in the GitHub repository that comes with this book:
rhsm_user: XXXXXXXXXXX
rhsm_password: XXXXXXXXXXX
10. Now that you have created the Vault file, you can write the header for the third and last play in the file exercise123.yaml. The most important part of this header is the vars_files part, which refers to the Vault file:
- name: use subscription manager to register and set up repos
  hosts: "{{ newhost }}"
  vars_files:
  - exercise123-vault.yaml
  tasks:
11. At this point you can complete the playbook and add the remaining tasks:
- name: register and subscribe {{ newhost }}
  redhat_subscription:
    username: "{{ rhsm_user }}"
    password: "{{ rhsm_password }}"
    state: present
- name: configure additional repo access
  rhsm_repository:
    name:
    - rh-gluster-3-client-for-rhel-8-x86_64-rpms
    - rhel-8-for-x86_64-appstream-debug-rpms
    state: present
tags: registerhost
12. At this point the playbook is ready. Compare what you have written to the sample playbook exercise123.yaml that is in the GitHub repository and give it a try. To do so, use the ansible-playbook -k --ask-vault-pass exercise123.yaml -e newhost=ansible5 -e newhostip=192.168.4.205 command. Everything should be running smoothly, but because this is a large playbook and it is very difficult to write it without typos right from the beginning, you might have to do a little bit of troubleshooting. To do so, I recommend that you use the tags that have been provided with the plays. If, after running the first and second plays successfully, the third play generates an error, you can run just that play again, using ansible-playbook --tags=registerhost exercise123.yaml -e newhost=ansible5. (Notice that this command doesn’t use as many command-line options as the command you used just a minute ago because these parameters don’t apply to the registerhost tag.) :::
Lab 12-1 #
Configure the control.example.com host as a repository server, according to the following requirements:
• Create a directory with the name /repo, and in that directory copy all packages that have a name starting with nginx.
• Generate the metadata that makes this directory a repository.
• Configure the Apache web server to provide access to the repository server. You just have to make sure that the DocumentRoot in Apache is going to be set to the /repo directory.
Lab 12-2 #
Write a playbook to configure all managed servers according to the following requirements:
• All hosts can access the repository that was created in Lab 12-1.
• Have the same playbook install the nginx package.
• Do NOT start the service. Use the appropriate module to gather information about the installed nginx package, and let the playbook print a message stating the name of the nginx package as well as the version. :::
[]{#ch13.xhtml}
::: {#ch13.xhtml#sbo-rt-content}